


Sweet, simple, and full of nostalgic charm, these Gluten-Free Conversation Heart Sugar Cookies are a Valentine’s Day classic reimagined. Inspired by the pastel candies we all grew up with, this recipe transforms that familiar Valentine’s favorite into a soft, buttery sugar cookie that’s just as fun to decorate as it is to eat.
The cookies themselves bake up tender with lightly crisp edges and a subtle blend of vanilla and almond, creating the perfect canvas for smooth royal icing and playful piped messages. Designed to hold their shape without sacrificing texture, they’re ideal for cutting, flooding, and decorating—whether you’re a seasoned cookie decorator or trying royal icing for the first time.
Perfect for gifting, sharing, or making a cozy Valentine’s Day baking project, these conversation heart sugar cookies strike a balance between nostalgic and elevated. With thoughtful tips throughout, this recipe walks you through each step so you can create bakery-worthy cookies at home—beautiful, festive, and completely gluten-free.

Why You’ll Love This Recipe
Perfect for decorating
The sugar cookies bake up soft and buttery while holding their shape beautifully, making them ideal for rolling, cutting, and decorating with royal icing.
Smooth, reliable royal icing
The icing floods easily, dries to a clean matte finish, and creates the perfect surface for piping those classic conversation heart messages.
Festive yet timeless
With soft pastel colors and playful lettering, these cookies feel special for Valentine’s Day while still delivering that classic sugar cookie flavor everyone loves.
Completely gluten-free, no compromises
These cookies have the texture and flavor of a traditional sugar cookie—no one will guess they’re gluten-free.
Ingredient Notes
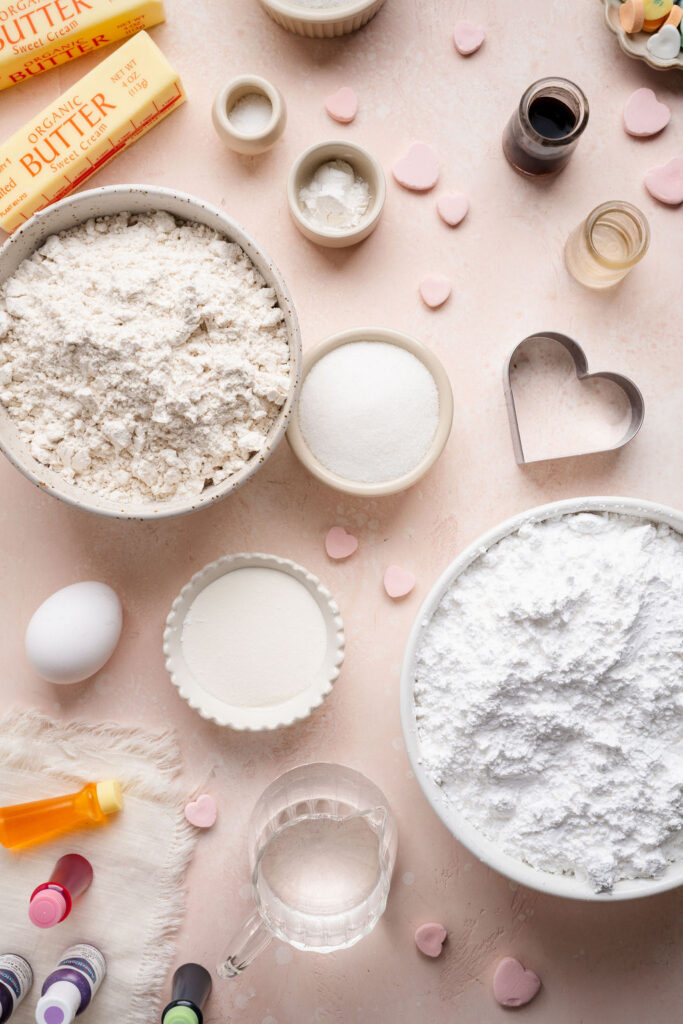
Gluten-Free 1:1 Flour
Use a gluten-free 1:1 flour blend that already contains xanthan gum for the best structure and texture (I love Bob’s Redmill).
Unsalted Butter
Butter provides the classic sugar cookie flavor and tender crumb. Make sure it’s at room temperature so it creams smoothly with the sugar, creating a light, even dough.
Granulated Sugar
Granulated sugar keeps the cookies crisp at the edges while maintaining a soft center. It also helps the cookies hold their shape as they bake.
Egg
A room-temperature egg helps the dough come together smoothly and ensures even mixing, which is especially important in gluten-free baking.
Vanilla & Almond Extracts
Vanilla adds warmth and familiarity, while a small amount of almond extract enhances the overall flavor without overpowering the cookies. If you prefer, the almond extract can be omitted for a more classic sugar cookie profile.
Baking Powder
Baking powder provides just enough lift for a tender texture without causing the cookies to spread.
Royal Icing Ingredients
Powdered sugar creates a smooth, glossy icing base, while meringue powder allows the icing to set firmly without the use of raw egg whites. Gel food coloring is recommended for achieving soft pastel shades without thinning the icing.
How to Make Conversation Heart Sugar Cookies
See the recipe card below for the full ingredient list, measurements, and instructions.
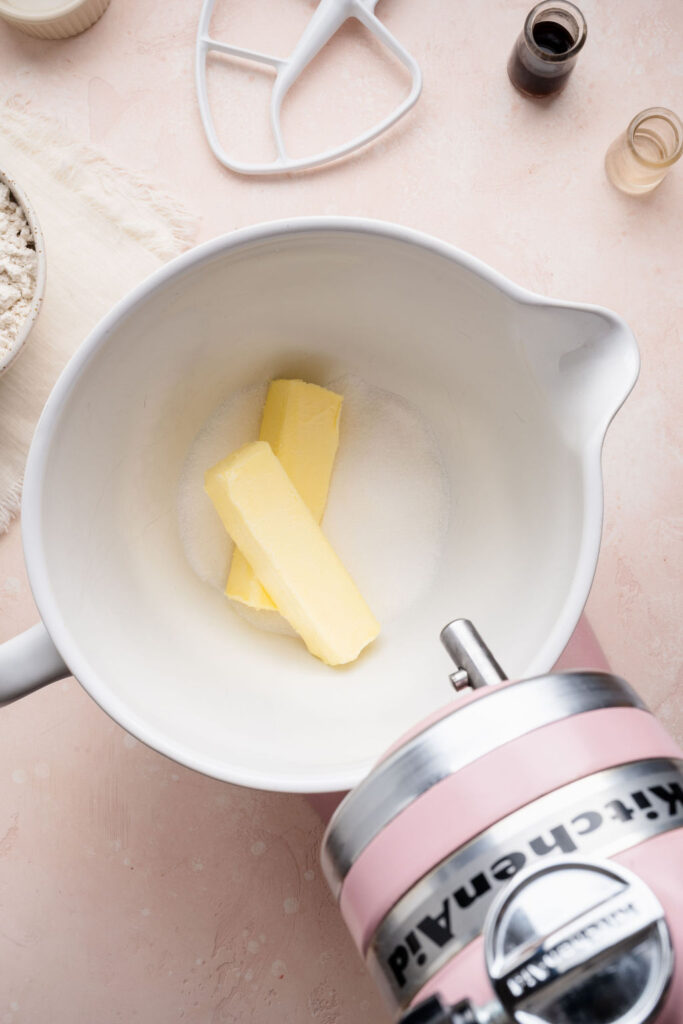
Step 1: Cream the butter and sugar together for 2-3 minutes until light and fluffy.
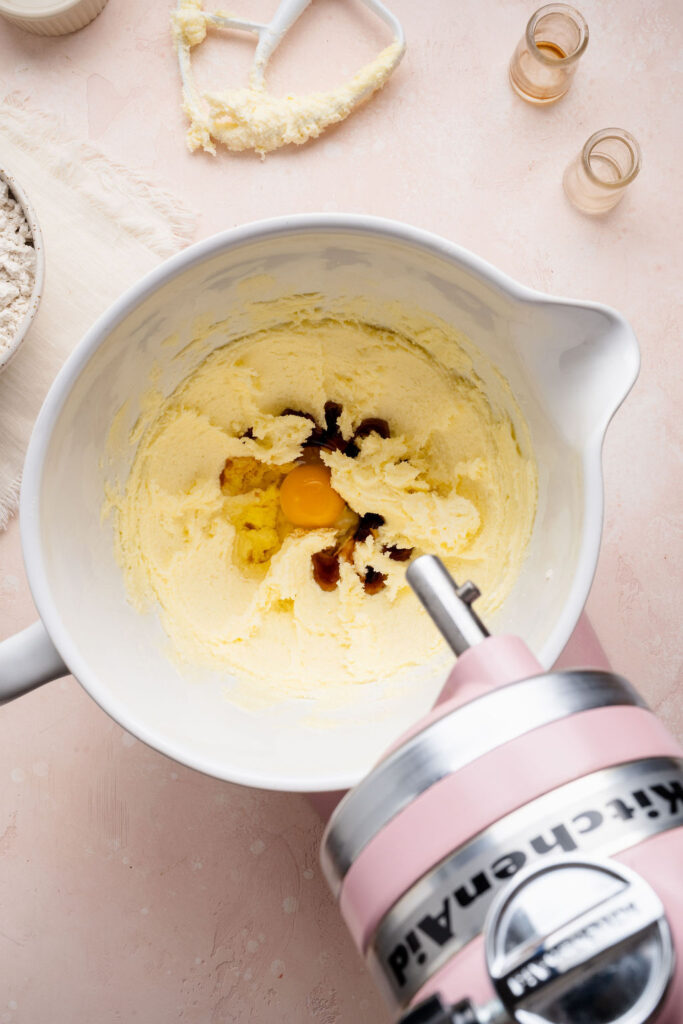
Step 2: Add the egg, vanilla extract, and almond extract and mix to combine.
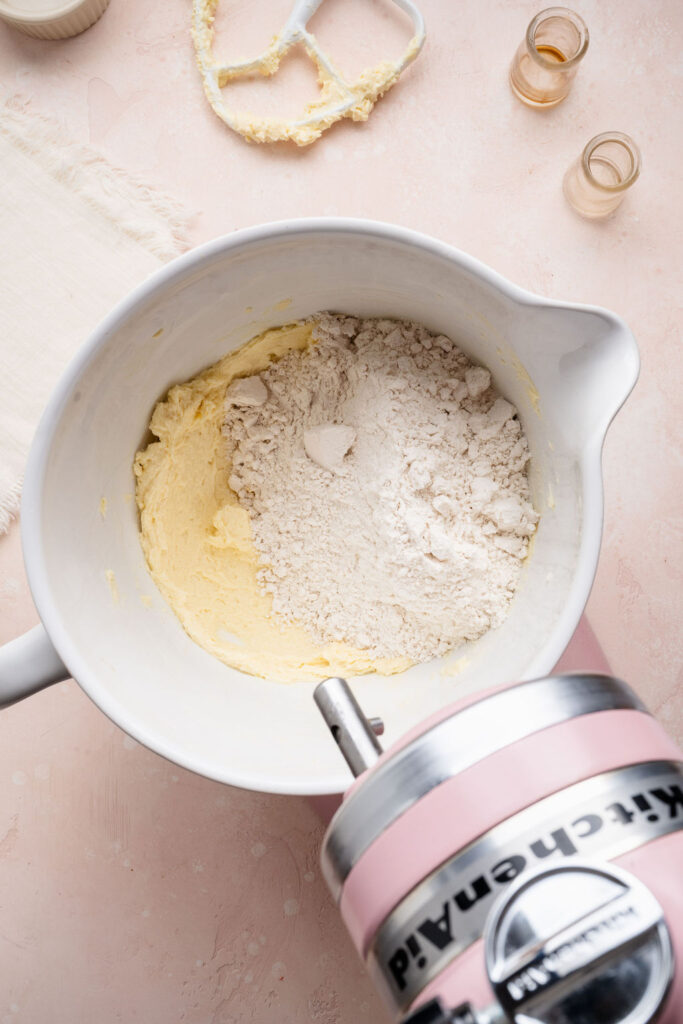
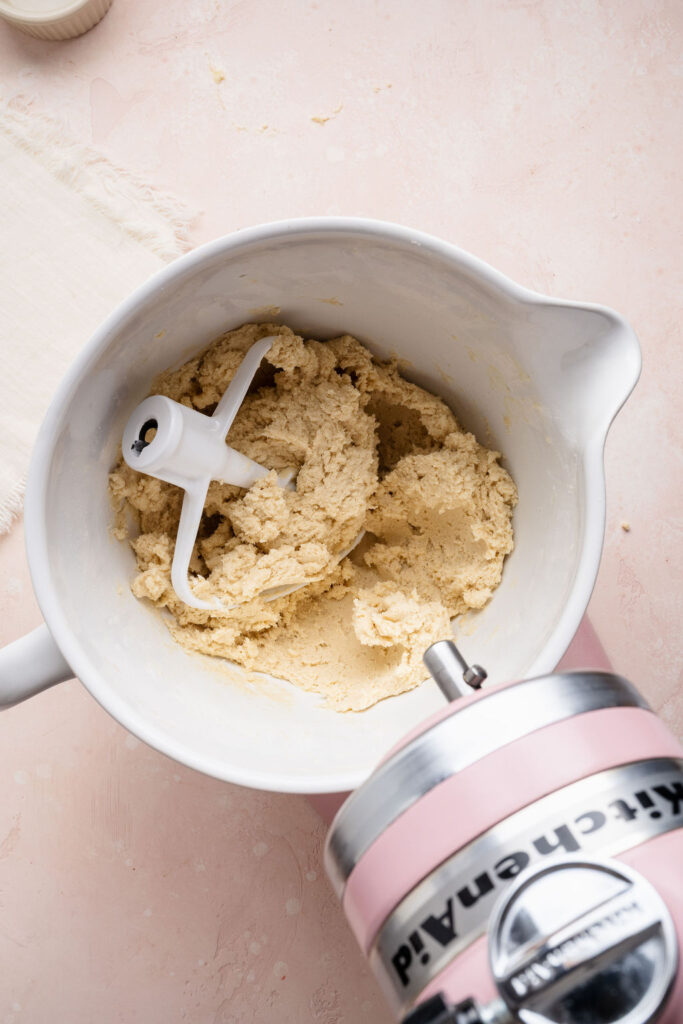
Step 3: Whisk together the gluten-free 1:1 flour, baking powder, and salt and add to the bowl with the wet ingredients. Mix on low until a cohesive dough forms. Divide the dough into two portions, wrap in plastic, and chill for at least 4 hours.
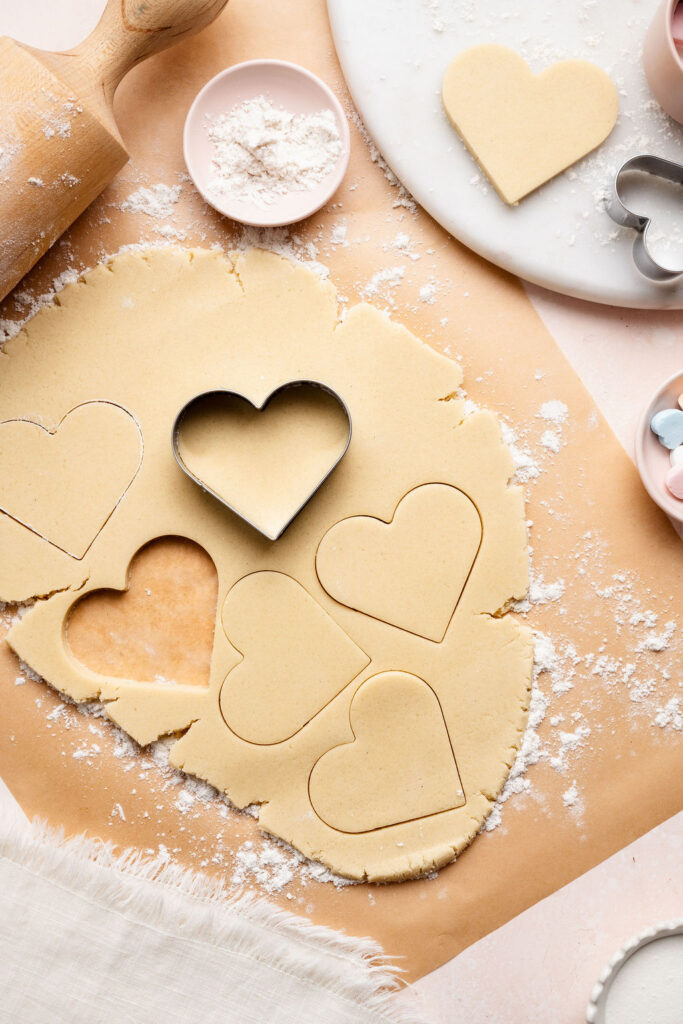
Step 4: Roll the dough out one disk at a time to ¼-inch thickness. Use a heart shaped cookie cutter to stamp out shapes. The dough can be rerolled if needed to get enough cookies to fill the baking sheet. (Photo 6)
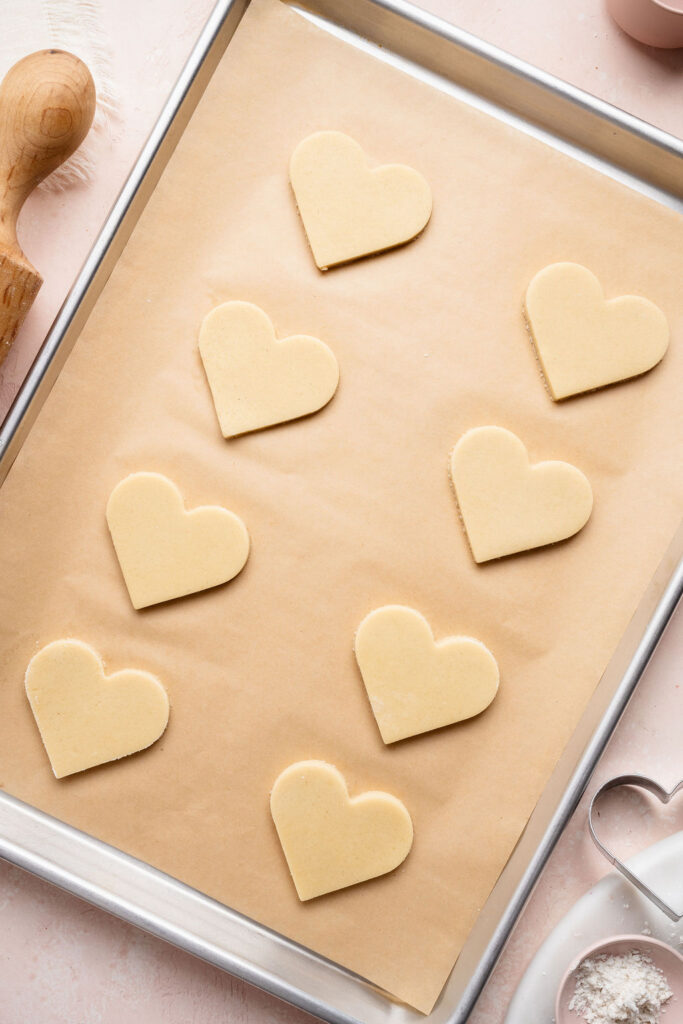
Step 5: Transfer the heart cut-outs to a large parchment lined baking sheet and bake at 350°F for 8-10 minutes. Remove from the oven and allow the cookies to cool on the pan for 5-10 minutes before transferring them to a wire cooling rack. (Photo 7 )
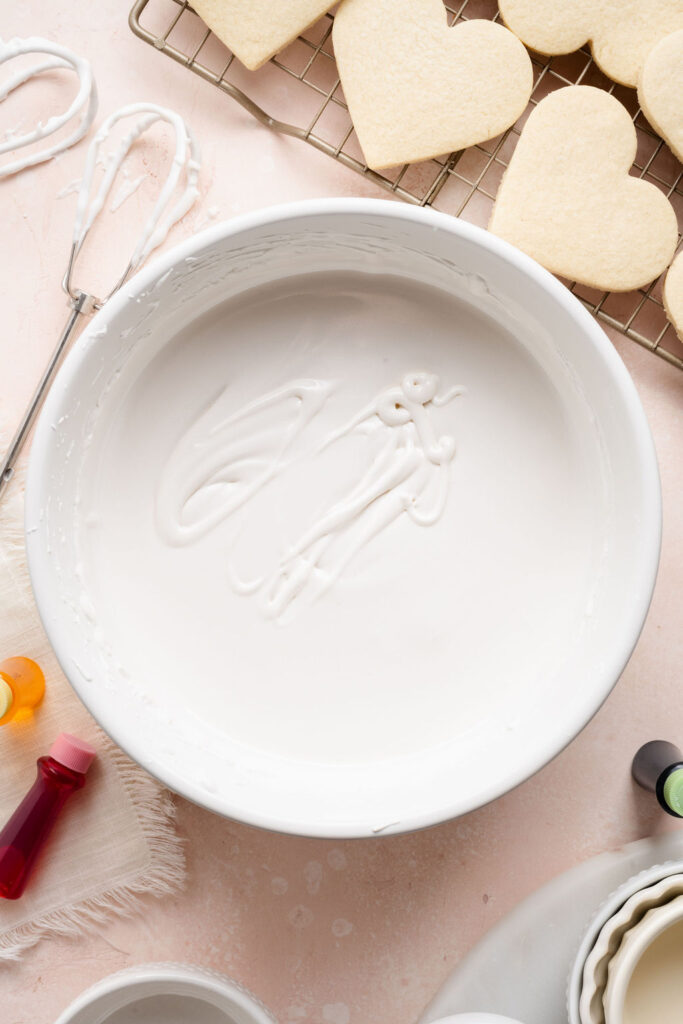
Step 6: After the cookies have fully cooled, prepare the royal icing. Whisk together the powdered sugar and meringue powder in a large mixing bowl. Then add 8 tbsp of water and the vanilla extract. Using an electric hand mixer, mix on low for 1 minute and then increase the speed to medium for an additional 2-3 minutes. Check the consistency by lifting the beater and drizzling the icing back into the bowl. It should take between 10-15 seconds for the lines to completely disappear back into the icing. Add more water if the icing is too thick or more powdered sugar if too thin. (Photo 8)
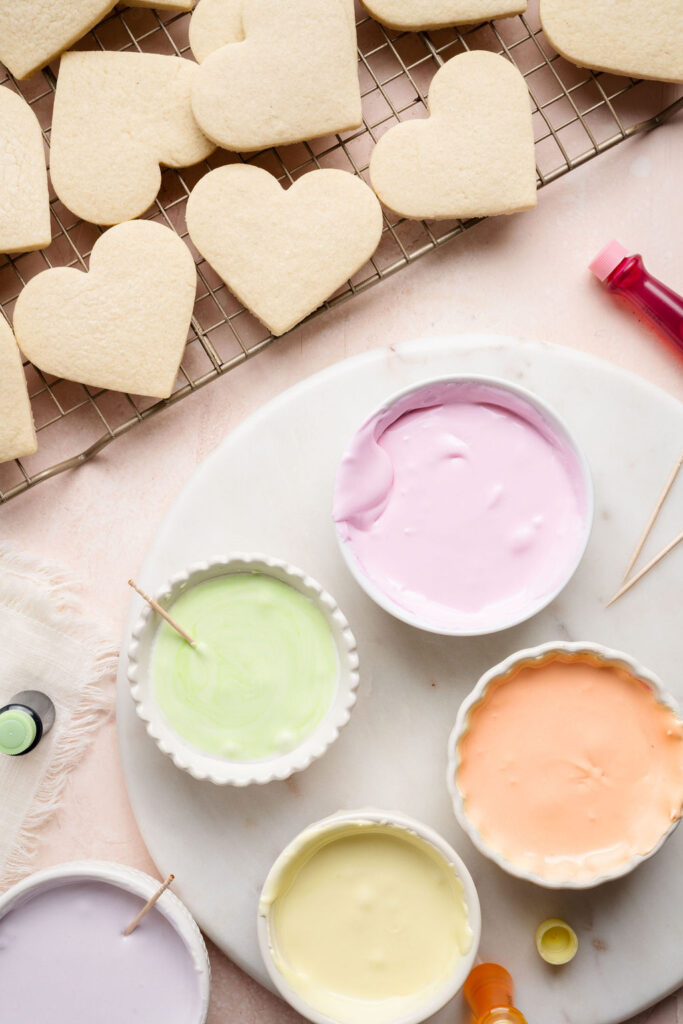
Step 7: Distribute the icing between 6 small bowls. Reserve one bowl for the lettering and place a piece of plastic wrap directly on the surface of the icing and cover it with foil. To the other five bowls of icing, tint with gel food coloring to get soft pastel colors. Transfer each bowl of icing into separate piping bags and snip the tip off of each bag when ready to use. (Photo 9)
Step 8: Place a #3 round piping tip on a disposable piping bag and insert one color icing bag at a time into this piping bag (this will allow you to swap colors easily without changing the piping tip between colors). Pipe an outline just inside the edge of the cookie and then fill in the inside of the cookie by piping the icing in a back and forth motion until the surface is covered. Use a toothpick to help smooth out and distribute the icing as needed. (Photo 10)

Step 9: Swap out the colors as needed until all of the cookies have been outlined and flooded. Allow the icing to fully set before adding the lettering on top (6-8 hours). (Photo 11)

Step10: Uncover the reserved bowl of icing and tint with red gel food coloring. Then thicken the icing by stirring in powdered sugar 1 tsp at a time until the consistency is similar to soft toothpaste. Transfer the icing to a piping bag with a #1 round piping tip and pipe conversation heart phrases onto each cookie (i.e. LOVE, HUGS, XOXO, CUTIE, SWEET, BE MINE, or any other phrases you like!). (Photo 12)

Recipe Tips
Chill the dough thoroughly
Chilling the dough for at least 4 hours is essential. It firms up the butter, makes the dough easier to roll and cut, and helps the cookies hold their shape as they bake.
Let the dough soften slightly before rolling
After chilling, allow the dough to sit at room temperature for a few minutes so it’s pliable but still cool. Dough that’s too cold can crack, while overly warm dough can stick and lose definition.
Roll to an even thickness
Rolling the dough to a consistent ¼-inch thickness ensures the cookies bake evenly and gives you soft centers with lightly crisp edges.


Use flour generously when rolling
Lightly flour both the work surface and the top of the dough, rotating it as you roll to prevent sticking.
Bake just until set
The cookies should look set and pale, with little to no browning. Overbaking can lead to a dry texture, so keep a close eye toward the end of baking.
Allow cookies to cool completely before decorating
Warm cookies will cause the icing to melt and lose definition. Make sure the cookies are fully cooled before outlining and flooding with royal icing.
Let the icing dry fully between steps
For the cleanest finish, allow the flooded icing to dry completely before adding lettering. This helps the piped messages sit neatly on the surface rather than sinking in.
Royal Icing Troubleshooting
Icing is too thin or runny
If the icing spreads too quickly or doesn’t hold an outline, it needs more structure. Add powdered sugar 1 tablespoon at a time, mixing well after each addition, until the icing thickens and the lines disappear in about 10-15 seconds.
Icing is too thick
If the icing doesn’t settle smoothly or feels difficult to pipe, add water 1 teaspoon at a time until the icing flows easily without losing definition.
Icing has air bubbles
Air bubbles can appear if the icing is overmixed. After mixing, let the icing rest for a few minutes and gently stir with a spatula to release trapped air. Use a toothpick to pop any remaining bubbles once the icing is on the cookie.
Icing isn’t smoothing out
If the surface looks textured or uneven, the icing is likely too thick. Slightly thinning it with water will help it settle into a smooth, even finish.
Lettering is spreading or sinking
This usually means the icing for the writing is too thin or the base layer hasn’t fully set. Thicken the lettering icing with additional powdered sugar and be sure the flooded icing is completely dry before piping words.
Lettering is cracking or breaking as you pipe
Cracking indicates icing that’s too stiff. Add a few drops of water and mix gently until the icing has a soft, toothpaste-like consistency that flows smoothly from the piping tip.

Storage & Freezing Recommendations
Storing the cookies
Once the icing has fully set, store the cookies in a single layer or between sheets of parchment paper in an airtight container at room temperature for up to 3 days. Keep them in a cool, dry place away from heat or humidity to maintain the smooth icing finish.
Freezing the cookies
Undecorated sugar cookies freeze beautifully. Once completely cooled, layer them between parchment paper in an airtight container or freezer-safe bag and freeze for up to 2 months. Thaw at room temperature before decorating.
Freezing decorated cookies
Decorated cookies can also be frozen once the icing has fully dried. Place the cookies in a single layer or stack them with parchment paper between layers in an airtight container and freeze for up to 1 month. Thaw uncovered at room temperature to prevent condensation from forming on the icing.


Gluten-Free Conversation Heart Sugar Cookies
- Total Time: 5 hours 10 minutes
- Yield: 24 cookies
- Diet: Gluten Free
Description
These Gluten-Free Conversation Heart Sugar cookies are soft, buttery, and perfect for decorating. Finished with smooth royal icing and playful piped messages, they’re a festive Valentine’s Day treat that’s just as fun to make as it is to share.
Ingredients
COOKIES
2 1/2 c (370g) gluten-free 1:1 flour
3/4 tsp baking powder
1/2 tsp fine kosher salt
1 c (226g) unsalted butter, room temperature
1 c (200g) granulated sugar
1 large egg, room temperature
2 tsp vanilla extract
1/2 tsp almond extract
ROYAL ICING
5 1/2 c (660g) powdered sugar
4 tbsp meringue powder
8–10 tbsp water, room temperature
1 tsp vanilla extract gel food coloring (pastel pink, peach, pastel purple , pastel yellow, green, and red/deep red)
EQUIPTMENT
heart shaped cookie cutter (~3″)
#1 and #3 piping tips
piping bags
toothpicks
Instructions
PREPARE THE COOKIE DOUGH
- Whisk together the gluten-free 1:1 flour, baking powder, and salt. Set aside.
- In a large mixing bowl or the bowl of stand mixer fitted with the paddle attachment, cream together the butter and sugar for 2-3 minutes until light and fluffy.
- Add the egg, vanilla extract, and almond extract and mix to combine.
- Add the dry ingredients to the wet ingredients and mix on low until a cohesive dough forms.
- Divide the dough in half, shape each half into a disk, and wrap in plastic wrap. Chill in the refrigerator for at least 4 hours.
BAKE THE COOKIES
- Preheat the oven to 350°F and line two large baking sheets with parchment paper. Set aside.
- Remove the dough from the refrigerator and allow it to set at room temperature to soften slightly while the oven preheats.
- On a floured work surface, roll out the dough one disk at a time to 1/4-inch thickness. Flour the surface of the dough and beneath the dough as needed and rotate the dough periodically to prevent sticking.
- Use a heart shaped cookie cutter to cut out shapes and place on the prepared baking sheet. The dough can be rerolled if needed to get enough cookies to fill the baking sheet.
- Bake on the center rack of the oven for 8-10 minutes.
- Remove from the oven and allow the cookies to cool on the pan for 5-10 minutes and then transfer to a wire rack to cool completely.
- Repeat the rolling out/baking process with the second disk of dough to fill the second cookie sheet.
MAKE THE ROYAL ICING
- In a large mixing bowl, whisk together the powdered sugar and meringue powder.
- Add 8 tbsp of water and the vanilla extract. Use an electric hand mixer on low to mix together for 1 minute and then increase the speed to medium for an additional 2-3 minutes. The mixture should be smooth, glossy, and slightly thickened. Avoid overmixing as this can cause air bubbles.
- Adjust the icing to reach the correct consistency: Lift the beater and drizzle the icing back into the bowl. The lines should disappear completely in about 10-15 seconds. If the lines disappear too quickly, add more powdered sugar 1 tbsp at a time. If the lines are taking too long to disappear/don’t disappear completely add more water 1 tsp at a time.
- Divide the icing between 6 small bowls.
- Reserve one of the bowls of icing for the writing. Place a piece of plastic wrap directly on the surface of the icing and then cover with foil. This icing can be left at room temperature for 24-48 hours.
- Tint the other five bowls of icing with gel food coloring. Add the food coloring a little at a time by placing a small amount on a toothpick until the desired color is reached (aim for soft pastel colors).
DECORATE THE COOKIES
- Place a #3 round piping tip on a piping bag and set aside (a #4 piping tip would also work!).
- Transfer all five bowls of colored icing into separate piping bags and snip a small opening off of each piping bag when ready to use.
- Insert one color bag at a time into the piping bag with the piping tip attached, pushing it down so it fits snuggly inside the piping tip (this will allow you to swap the colors easily without changing the piping tip between colors).
- Pipe an outline just inside the edge of each heart cookie. Then fill the outlined area by piping the icing in a back and forth motion until the surface is covered (it won’t look smooth at first but will slowly begin to settle and blend together). Use a toothpick to smooth out/help distribute the icing and pop any air bubbles if needed.
- Swap out the colors as needed until all of the cookies have been outlined and flooded.
- Allow the cookies to dry uncovered at room temperature for 6-8 hours or overnight, until the surface is completely firm and matte before adding the lettering. The cookies can be placed uncovered in the refrigerator to speed up the drying process if needed.
- When ready to pipe the lettering, remove the foil and plastic wrap from the reserved bowl of icing and use the red gel food coloring to tint the icing red.
- Then thicken the icing by stirring in additional powdered sugar 1 tsp at a time until the consistency is similar to soft toothpaste.
- Place the icing into a piping bag with a #1 round piping tip (a #1.5 would work too) and pipe conversation heart phrases on the cookies (XOXO, BE MINE, HUGS, LOVE, CUTIE, BFF, KISS, BABE, SWEET, etc). If the icing is not flowing easily or is cracking, add more water. If the lettering is not sitting on top of the cookie or is spreading, add more powdered sugar.
Notes
Store the cookies in a single layer or between sheets of parchment paper in an airtight container at room temperature for 3 days. Enjoy!
- Prep Time: 1 hour
- Chill: 4 hours
- Cook Time: 10 minutes
- Category: Cookies
Photography by Creating Kaitlin


Leave a Reply