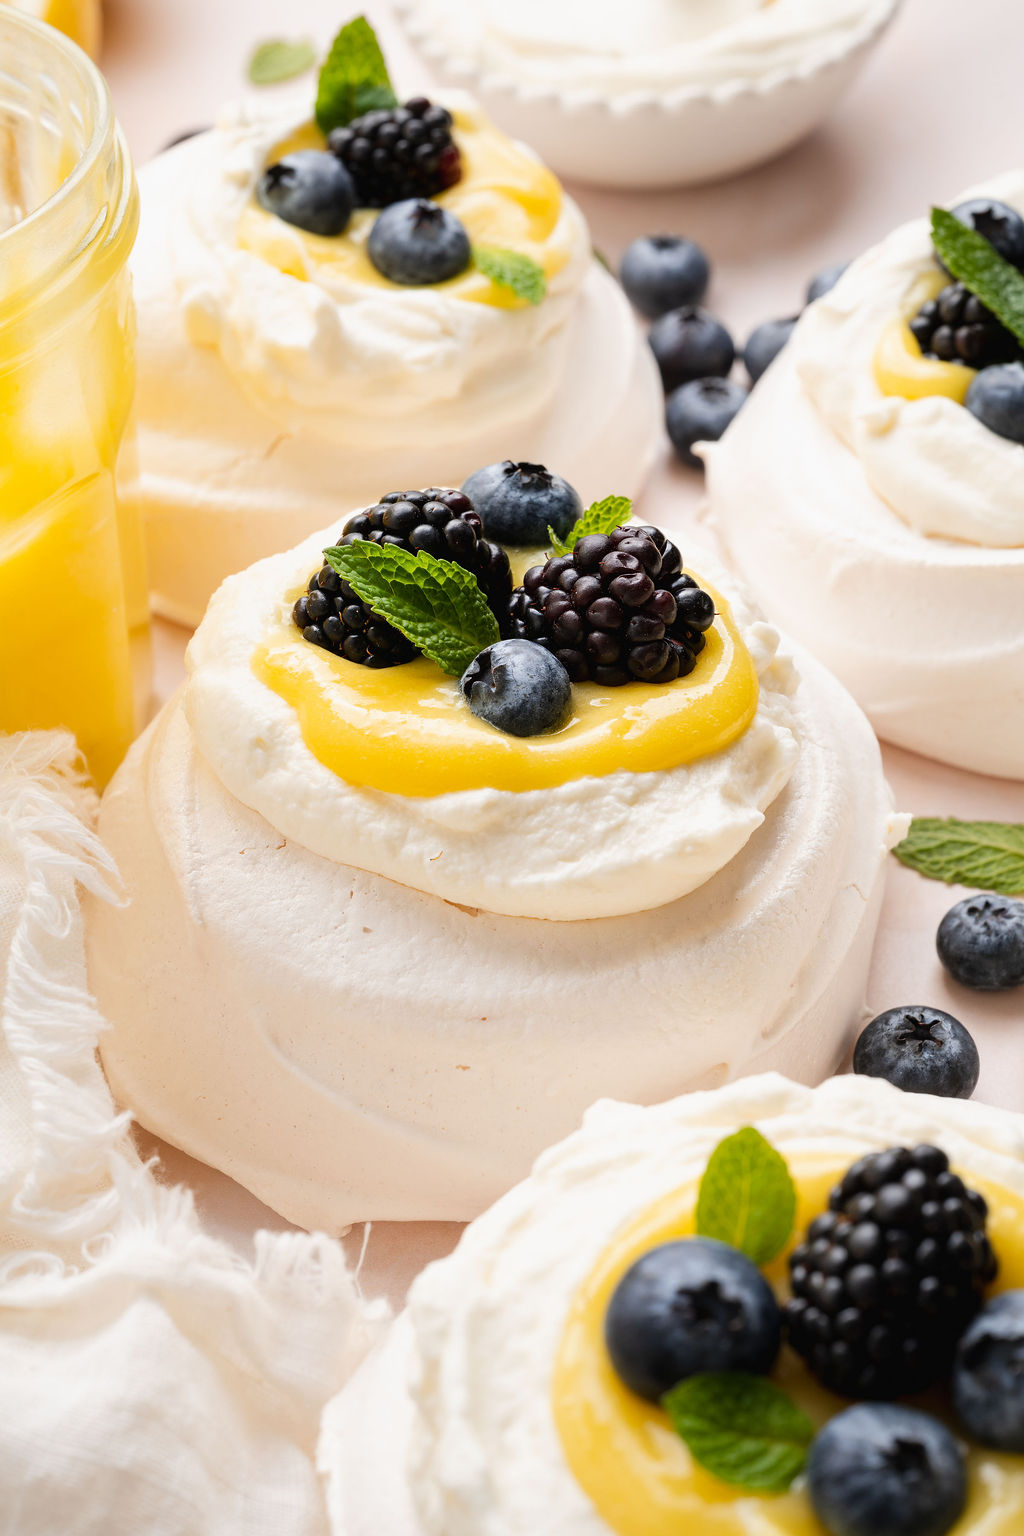


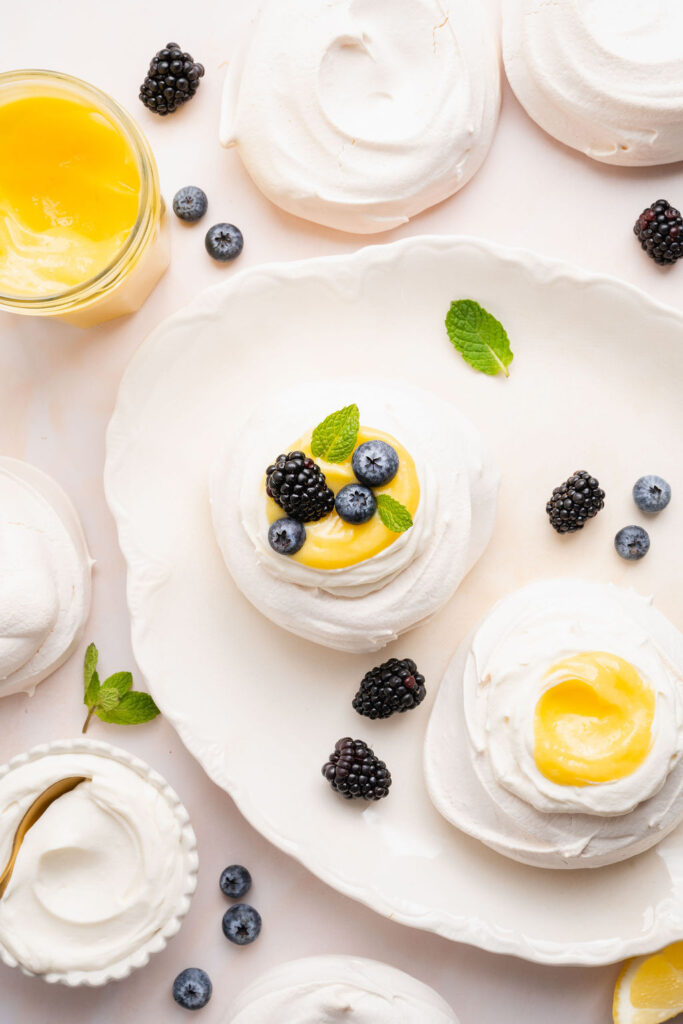
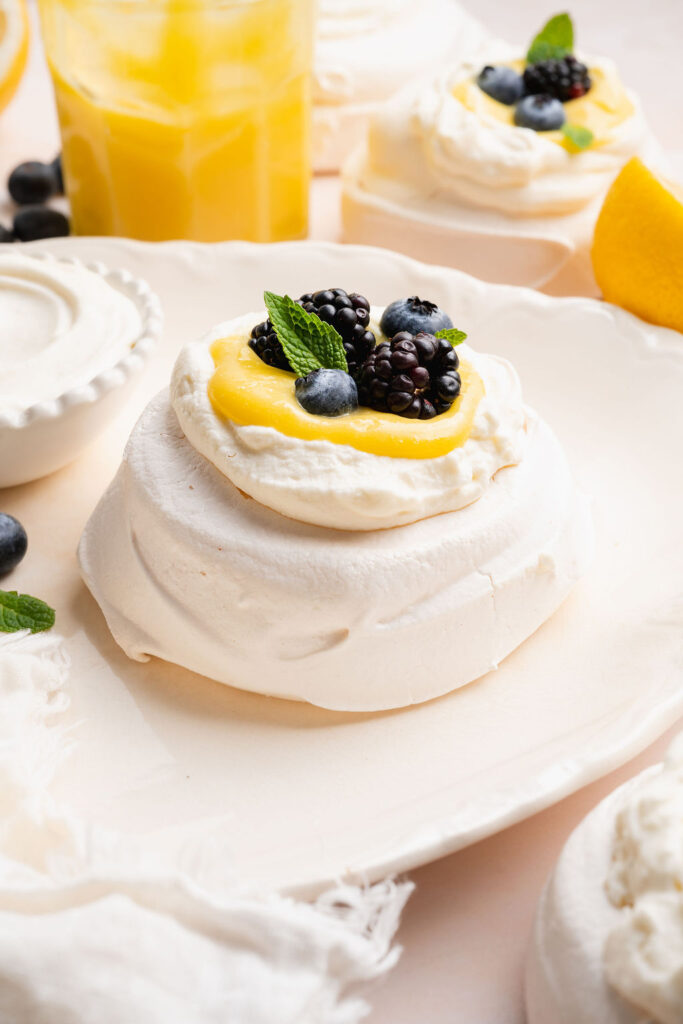
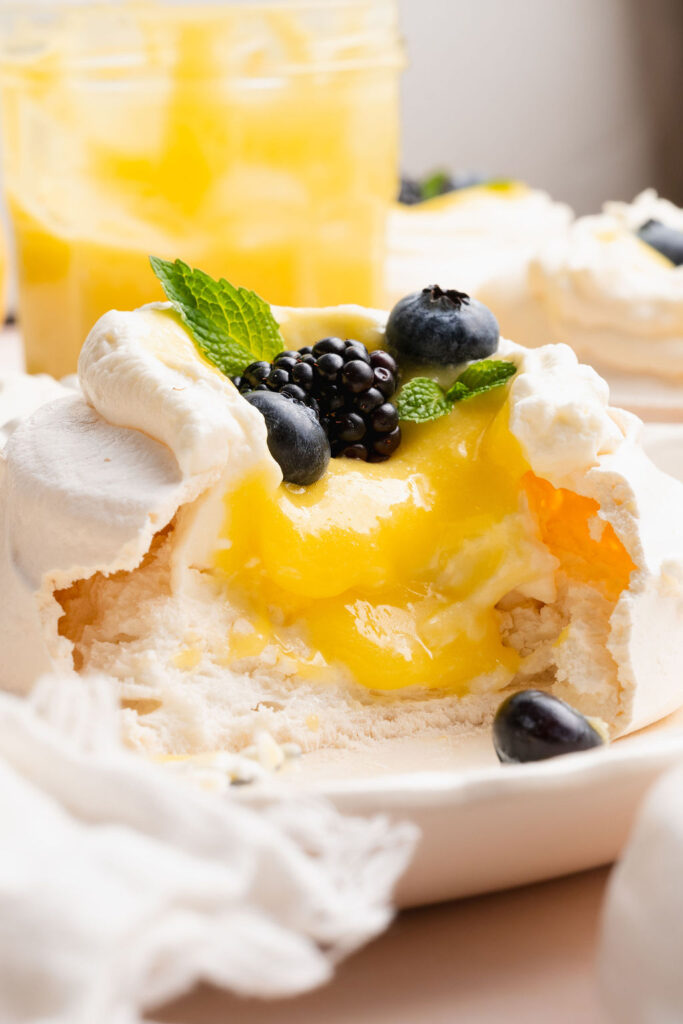
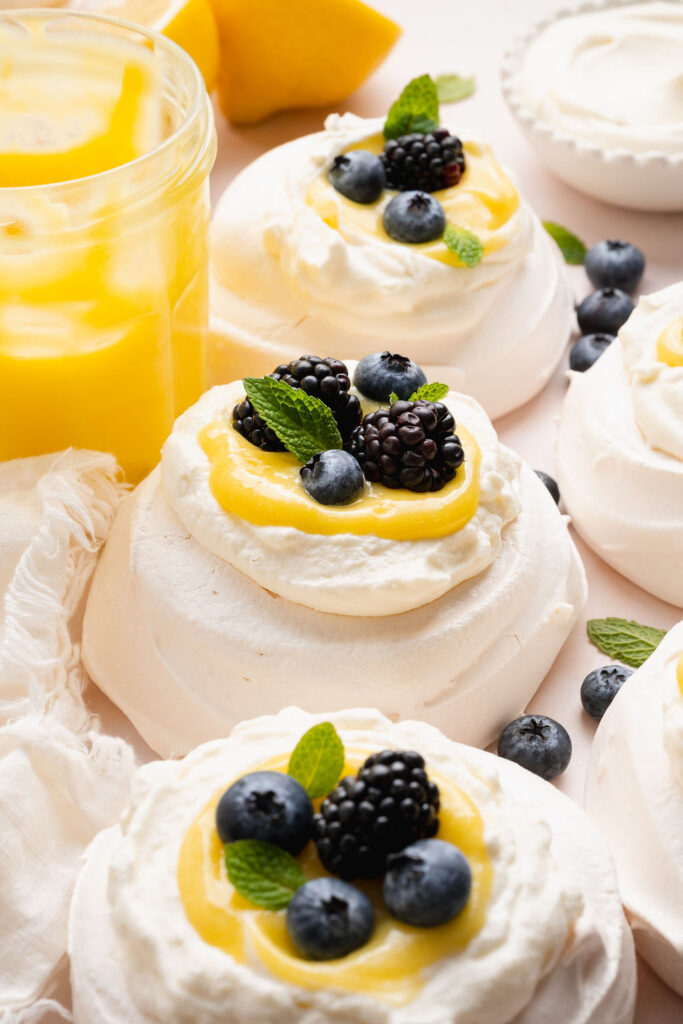
Crisp meringue, softly whipped mascarpone, and bright lemon curd come together in these delicate mini pavlovas. Each one is layered with texture and flavor—from the light, crisp shell to the soft, marshmallow-like center—then finished with a generous spoonful of mascarpone cream and a handful of fresh berries.
These gluten-free mini pavlovas feel both elegant and effortless, making them just as perfect for a spring gathering or dinner party as they are for a quiet afternoon with something sweet. The combination is light yet indulgent, with just the right balance of sweetness and brightness.
While pavlova has a reputation for being a bit fussy, this version is surprisingly approachable once you understand the method. With a few key techniques (and a little patience), you’ll end up with beautifully crisp shells, soft centers, and a dessert that looks just as stunning as it tastes.

Why You’ll Love This Recipe
These mini pavlovas are light, elegant, and surprisingly simple to make. With their crisp exterior and soft, marshmallow-like centers, they deliver that classic pavlova texture in a perfectly portioned, individual dessert.
The combination of whipped mascarpone, lemon curd, and fresh berries creates a beautiful balance of flavors—lightly sweet, creamy, and bright with just enough tang. It’s the kind of dessert that feels special without being overly rich.
They’re naturally gluten-free and ideal for entertaining. Because they’re individually portioned, they make a stunning presentation for spring gatherings, holidays, or dinner parties, while still being easy to assemble just before serving.
Ingredient Notes
Egg Whites
Use room temperature egg whites for the best volume and stability when whipping the meringue. It’s easiest to separate the eggs while cold, then let the whites sit at room temperature for about 20–30 minutes before using.
Granulated Sugar
Adding the sugar gradually helps it dissolve fully into the meringue, creating a smooth, glossy texture and helping the pavlovas hold their shape.
Cornstarch
A small amount of cornstarch helps create that signature soft, marshmallow-like center while keeping the exterior crisp.
Lemon Juice
Just a touch of acidity helps stabilize the meringue and contributes to a smoother, more consistent texture.
Vanilla Extract
Adds a subtle warmth that rounds out the flavor of the meringue without overpowering the other components.
Mascarpone Whipped Cream
Use cold mascarpone, heavy cream, powdered sugar, and a touch of vanilla extract to create a rich, slightly tangy base that pairs beautifully with the sweet meringue and bright lemon curd.
Lemon Curd (Homemade or Store-Bought)
Adds brightness and a vibrant citrus note that balances the sweetness of the pavlovas. Homemade lemon curd offers the best flavor and texture and is a great way to use up the leftover egg yolks, but a high-quality store-bought option works well for convenience.
Fresh Berries
Blueberries and blackberries add freshness, color, and a slight tartness that balances the sweetness of the pavlovas.
How to Make Mini Pavlovas
See the recipe card below for the full ingredient list, measurements, and instructions.
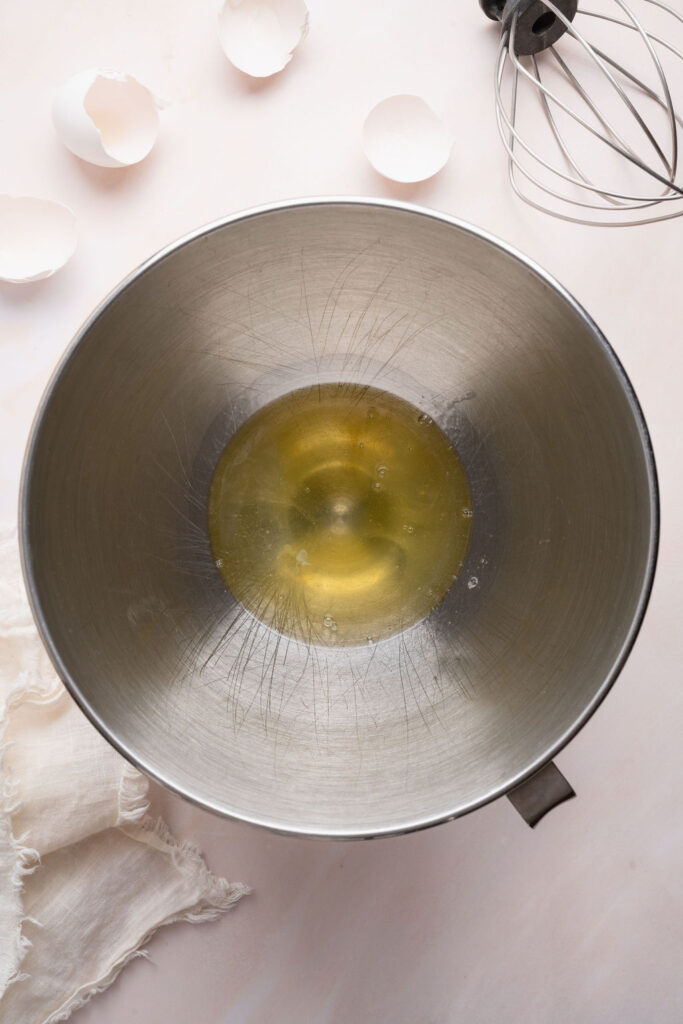
Step 1: In the bowl of a stand mixer fitted with the whisk attachment, beat the egg whites and salt on medium speed until foamy, about 1–2 minutes.
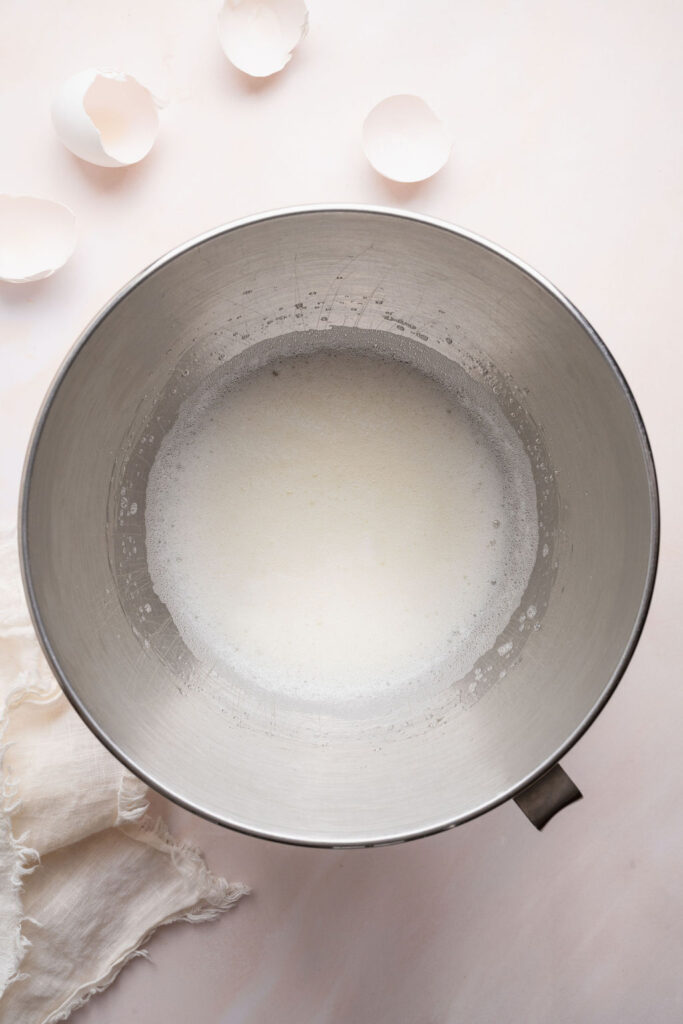
Step 2: With the mixer on medium speed, gradually add the sugar, 1 tablespoon at a time, waiting 15–20 seconds between each addition.
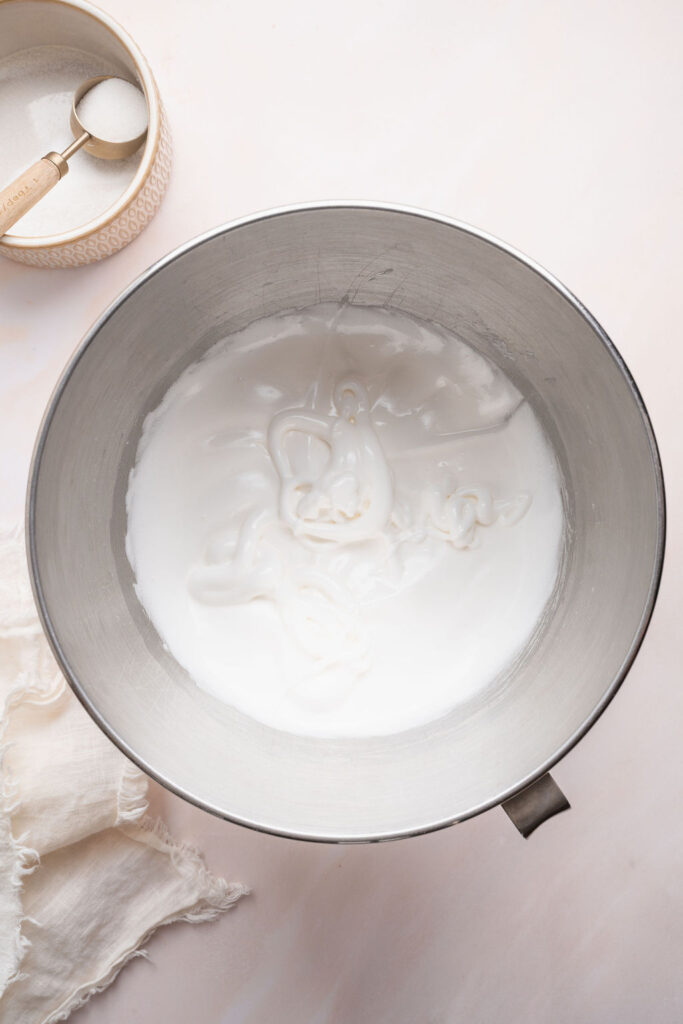
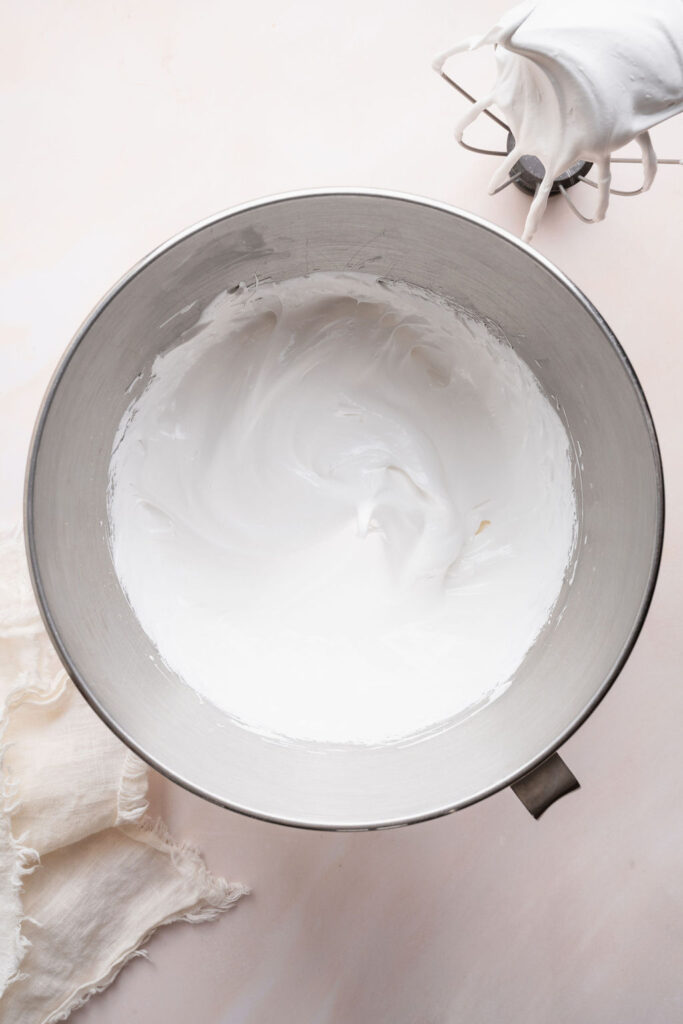
Step 3: Increase the speed to medium-high and whip until stiff, glossy peaks form and the meringue is smooth and no longer grainy, about 8–10 minutes.
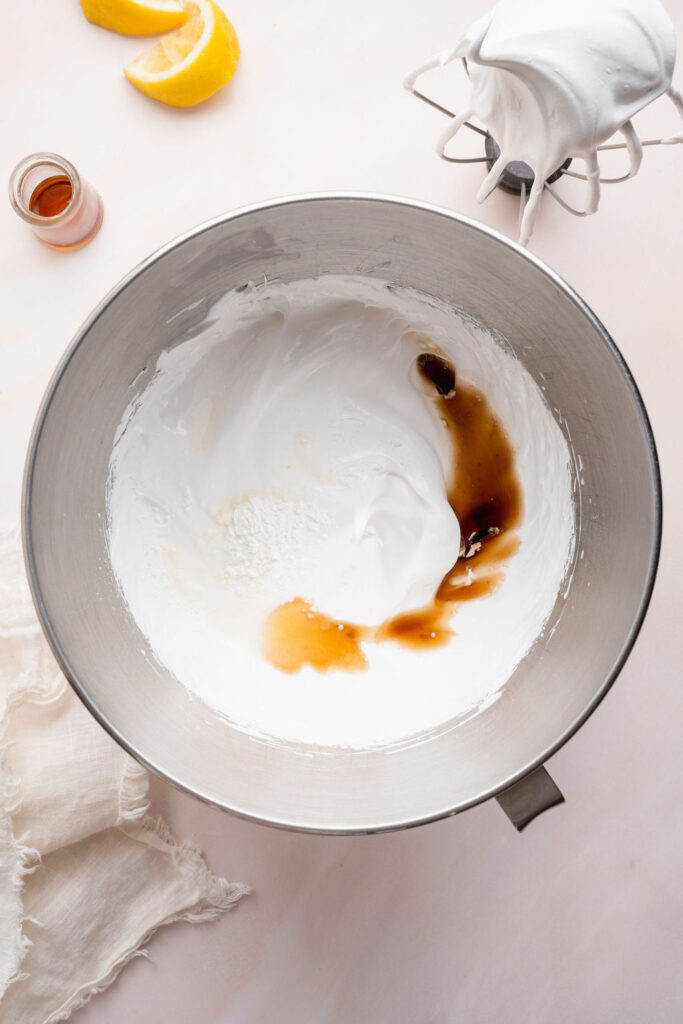
Step 4: Add the cornstarch, lemon juice, and vanilla extract and mix on low speed just until combined.
Step 5: Pipe the meringue onto a parchment-lined baking sheet into six 3-inch mounds. Use the back of a spoon to create a small indentation in the center and gently shape the edges.

Step 6: Bake at 225°F for 60 minutes, then turn off the oven and let the pavlovas cool inside with the door closed for 1–2 hours. They should be dry to the touch with a crisp shell and soft center.
Step 7: Top with whipped mascarpone, lemon curd, and fresh berries just before serving.
Recipe Tips
Make sure your bowl is completely clean
Any trace of grease or residue can prevent the egg whites from whipping properly. For best results, use a clean metal or glass bowl and avoid plastic if possible.
Add the sugar slowly
Adding the sugar one tablespoon at a time (with a short pause between each addition) allows it to fully dissolve into the meringue. This is key for achieving a smooth, glossy texture and stable structure.
Whip to stiff, glossy peaks
The meringue should hold its shape when you lift the whisk, with peaks that stand straight or gently curl at the tip. If the mixture looks dull or feels grainy, it likely needs a bit more mixing.
Don’t skip the cornstarch and acid
The small amount of cornstarch and lemon juice helps create that signature pavlova texture—crisp on the outside with a soft, marshmallow-like center.
Shape with intention, but don’t overthink it
Use the back of a spoon to create a slight well in the center for the filling and gently shape the edges. A slightly rustic look is part of the charm, so perfection isn’t necessary!
Bake low and cool slowly
The low oven temperature helps dry out the pavlovas without browning them. Once baking is complete, let them cool in the oven with the door closed so they can dry out fully and avoid cracking.
Expect a few cracks
A little cracking is completely normal and part of the pavlova’s character. As long as the exterior is crisp and the inside is soft, they’ve turned out exactly as they should.
Assemble just before serving
For the best texture, add the mascarpone cream, lemon curd, and berries right before serving. This keeps the shells crisp and prevents them from softening too much.
Storage Recommendations
Store unassembled pavlovas at room temperature
Once fully cooled, the pavlova shells can be stored in an airtight container at room temperature for up to 2 days. Keep them in a cool, dry place to maintain their crisp exterior.
Avoid refrigeration for the shells
Refrigeration can introduce moisture, causing the pavlovas to soften and lose their crisp texture.
Store assembled pavlovas in the refrigerator
Once topped with whipped mascarpone, lemon curd, and berries, the pavlovas should be stored in the refrigerator and enjoyed within 1 day. The shells will begin to soften as they sit.
Make components ahead for easy assembly
The lemon curd can be made several days in advance and stored in the refrigerator. The mascarpone cream can be made a few hours ahead and kept chilled until ready to use.
Frequently Asked Questions
Why didn’t my egg whites whip properly?
This is usually due to fat or residue in the mixing bowl or on the whisk. Even a small amount can prevent the egg whites from whipping. Make sure all equipment is completely clean and dry before starting.
How do I know when the meringue is ready?
The meringue should be thick, glossy, and hold stiff peaks. When you lift the whisk, the peaks should stand straight or gently curl at the tip, and the mixture should feel smooth—not grainy—when rubbed between your fingers.
Why did my pavlovas crack?
A few cracks are completely normal and part of pavlova’s signature look. Larger cracks can happen from rapid temperature changes, so it’s important to let them cool slowly in the oven.
Can I make pavlovas ahead of time?
Yes—the shells can be made 1–2 days in advance and stored in an airtight container at room temperature. For the best texture, assemble with the toppings just before serving.
Can I use store-bought lemon curd?
Absolutely. Homemade lemon curd will give you the best flavor, but a good-quality store-bought option works well for convenience.
What if my pavlovas turn out soft or sticky?
This usually means they need a bit more drying time. You can place them back in a low oven (around 200–225°F) for 15–20 minutes to help crisp them up.

Gluten-Free Mini Pavlovas
- Total Time: 2 hours 30 minutes
- Yield: 6 pavlovas
- Diet: Gluten Free
Description
These gluten-free mini pavlovas feature a crisp, delicate shell with a soft, marshmallow-like center, topped with lightly sweetened whipped mascarpone, lemon curd, and fresh berries. They’re elegant, balanced, and perfect for any occasion that calls for something a little special.
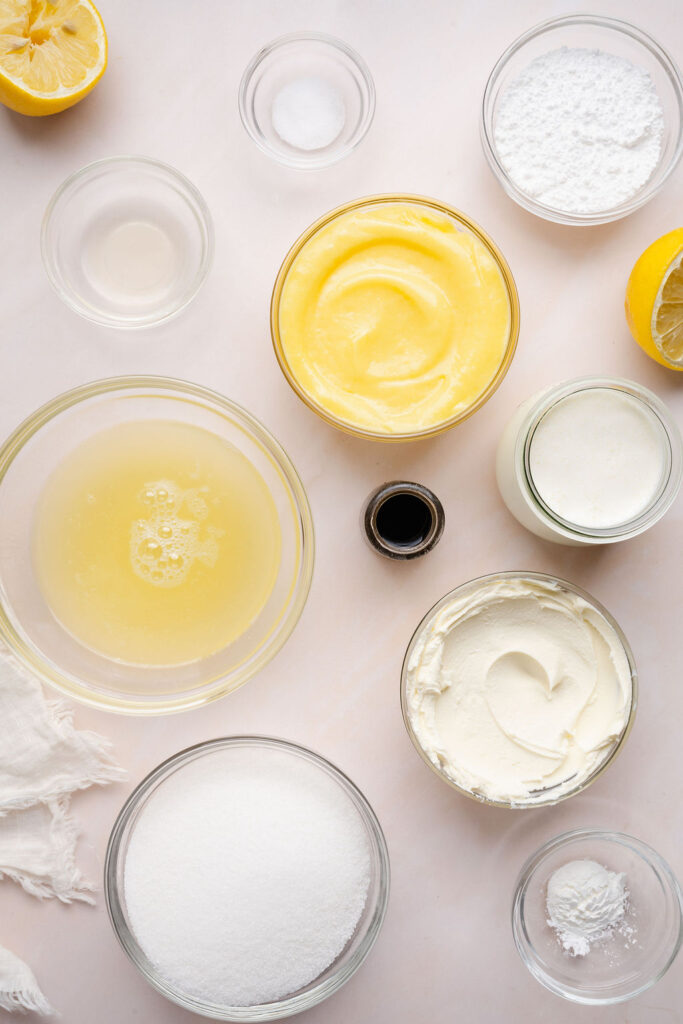
Ingredients
PAVLOVAS
4 large egg whites (~125g), room temperature
pinch of fine kosher salt
1 cup (200g) granulated sugar
1 teaspoon cornstarch
1 teaspoon lemon juice
1/2 teaspoon vanilla extract
WHIPPED MASCARPONE CREAM
1/2 cup (112g) mascarpone cheese, cold
1/4 cup (30g) powdered sugar
1/2 teaspoon vanilla extract
pinch of fine kosher salt
3/4 cup (180g) heavy cream, cold
LEMON CURD
3/4 cup (180g) lemon curd (homemade or store-bought)*
FOR SERVING
Fresh berries (such as blueberries and blackberries)
Fresh mint (optional)
Instructions
PREPARE THE LEMON CURD
- If using homemade lemon curd, prepare it in advance so it has time to chill and fully set before assembling the pavlovas.
PREHEAT THE OVEN AND PREPARE THE BAKING PAN
- Preheat the oven to 225°F.
- Use a pencil to trace six 3-inch circles on a large piece of parchment paper to use as guides for piping the pavlovas. Flip the parchment paper over and place it on a baking sheet (you should still be able to see the circles through the paper). Set aside.
PREPARE THE MERINGUE FOR THE PAVLOVAS
- Place the room temperature egg whites and a pinch of salt in the bowl of a stand mixer fitted with the whisk attachment (use a clean glass or metal bowl).
- Whisk the egg whites and salt on medium speed until foamy. This will take 1–2 minutes.
- With the mixer still on medium speed, add the granulated sugar 1 tablespoon at a time, waiting 15–20 seconds between each addition. Once all of the sugar has been added, gently scrape down the sides of the bowl if needed.
- Increase the mixer speed to medium-high and continue mixing until stiff, glossy peaks form and the sugar is fully dissolved, about 8–10 minutes. The meringue should feel smooth—not grainy—when rubbed between your fingers. To check for stiff peaks, stop the mixer and lift the whisk straight up—the peaks should stand straight or just slightly curl at the tip.
- Add the cornstarch, lemon juice, and vanilla extract and mix on low speed just until combined.
BAKE THE PAVLOVAS
- Transfer the meringue to a large piping bag (a 16-inch piping bag works well). You can use a large round piping tip or simply cut a large opening at the tip of the bag.
- Using the guides on the parchment paper, pipe the meringue into 6 mounds. Start by piping directly into the center of each circle until the meringue reaches the border, then pipe a smaller mound on top to add height (they will spread slightly as they bake).
- Use the back of a spoon to gently create a small indentation in the center of each pavlova to hold the toppings. You can also use the spoon to smooth or shape the edge — a slightly rustic look is perfect.
- Bake on the center rack for 60 minutes. Then turn off the oven and leave the pavlovas inside with the door closed for 1–2 hours to cool gradually. The pavlovas should be dry to the touch and release easily from the parchment paper. A few cracks are completely normal—they should have a crisp shell with a soft, marshmallow-like interior.
MAKE THE WHIPPED MASCARPONE
- Add the cold mascarpone and powdered sugar to a mixing bowl and mix on low speed until smooth.
- Add the vanilla extract and salt and mix just until combined.
- With the mixer on low speed, slowly stream in the heavy cream.
- Once all of the cream has been added, increase the speed to medium to medium-high and whip until soft to soft-medium peaks form.
GARNISH AND SERVE THE PAVLOVAS
- Spoon a dollop of whipped mascarpone cream in the center of each pavlova.
- Spoon the lemon curd over the whipped mascarpone.
- Top with fresh berries and mint. Enjoy!
Notes
Lemon Curd: You’ll need about 3/4 cup of lemon curd for this recipe. I recommend using my Homemade Lemon Curd recipe for the best flavor and texture, though a high-quality store-bought option works well too.
- Prep Time: 30 minutes
- Cook Time: 2 hours
- Category: Cakes
Photography by Creating Kaitlin


Leave a Reply